
Hướng dẫn gửi mail với Laravel 5
Gmail and Laravel
Hello, đến hẹn lại lên hôm nay mình xin viết một bài hướng dẫn gửi mail với Laravel 5 cụ thể ở đây mình dùng laravel 5.2 và Gmail.
Trước hết bước đầu tiên ta phải config lại để project có thể kết nối đến Gmail.
B1: Sửa .env
Tìm dòng tương ứng và sửa lại nhé. nếu không có thì bạn ghi thêm vào là được. .env
MAIL_DRIVER=smtp
MAIL_HOST=smtp.gmail.com
MAIL_PORT=587
[email protected]
MAIL_PASSWORD=apppassword
MAIL_ENCRYPTION=tls
Với gmail thì ta sẽ sử dụng phương thức gửi mail là smtp, host của gmail là smtp.gmail.com, cổng để kết nối đến gmail là 587, MAIL_USERNAME chính là gmail của bạn và bạn cần phải thay [email protected] = gmail của bạn nhé không là tòi đấy. MAIL_PASSWORD chính là mật khẩu của gmail bạn vừa nhập. Khi nhập password này bạn phải chú ý một vài điều này nhé.
Nếu bạn bật mật khẩu 2 nấc, hoặc chế độ bảo mật cao thì sẽ không thể đăng nhập được đâu. Khi đó bạn cần phải tạo mật khẩu app 1 lần của gmail để dùng vào nhé. Mình không khuyến khích bỏ mật khẩu nâng cao đi.
Nếu bạn chưa rõ làm như thế nào thì mình sẽ chỉ ở dưới bài nhé :3
Nếu bạn không dùng env và sài file config của laravel thì bạn vào /config/mail.php
<?php

return [

    /*
    |--------------------------------------------------------------------------
    | Mail Driver
    |--------------------------------------------------------------------------
    |
    | Laravel supports both SMTP and PHP's "mail" function as drivers for the
    | sending of e-mail. You may specify which one you're using throughout
    | your application here. By default, Laravel is setup for SMTP mail.
    |
    | Supported: "smtp", "mail", "sendmail", "mailgun", "mandrill",
    |            "ses", "sparkpost", "log"
    |
    */

    'driver' => env('MAIL_DRIVER', 'smtp'),

    /*
    |--------------------------------------------------------------------------
    | SMTP Host Address
    |--------------------------------------------------------------------------
    |
    | Here you may provide the host address of the SMTP server used by your
    | applications. A default option is provided that is compatible with
    | the Mailgun mail service which will provide reliable deliveries.
    |
    */

    'host' => env('MAIL_HOST', 'smtp.gmail.com'),

    /*
    |--------------------------------------------------------------------------
    | SMTP Host Port
    |--------------------------------------------------------------------------
    |
    | This is the SMTP port used by your application to deliver e-mails to
    | users of the application. Like the host we have set this value to
    | stay compatible with the Mailgun e-mail application by default.
    |
    */

    'port' => env('MAIL_PORT', 587),

    /*
    |--------------------------------------------------------------------------
    | Global "From" Address
    |--------------------------------------------------------------------------
    |
    | You may wish for all e-mails sent by your application to be sent from
    | the same address. Here, you may specify a name and address that is
    | used globally for all e-mails that are sent by your application.
    |
    */

    'from' => ['address' => '[email protected]', 'name' => 'visitor'],

    /*
    |--------------------------------------------------------------------------
    | E-Mail Encryption Protocol
    |--------------------------------------------------------------------------
    |
    | Here you may specify the encryption protocol that should be used when
    | the application send e-mail messages. A sensible default using the
    | transport layer security protocol should provide great security.
    |
    */

    'encryption' => env('MAIL_ENCRYPTION', 'tls'),

    /*
    |--------------------------------------------------------------------------
    | SMTP Server Username
    |--------------------------------------------------------------------------
    |
    | If your SMTP server requires a username for authentication, you should
    | set it here. This will get used to authenticate with your server on
    | connection. You may also set the "password" value below this one.
    |
    */

    'username' => '[email protected]',

    /*
    |--------------------------------------------------------------------------
    | SMTP Server Password
    |--------------------------------------------------------------------------
    |
    | Here you may set the password required by your SMTP server to send out
    | messages from your application. This will be given to the server on
    | connection so that the application will be able to send messages.
    |
    */

    'password' => 'apppass',

    /*
    |--------------------------------------------------------------------------
    | Sendmail System Path
    |--------------------------------------------------------------------------
    |
    | When using the "sendmail" driver to send e-mails, we will need to know
    | the path to where Sendmail lives on this server. A default path has
    | been provided here, which will work well on most of your systems.
    |
    */

    'sendmail' => '/usr/sbin/sendmail -bs',
    'pretend' => false,
    ];
Bạn tìm dòng tương ứng và sửa lại cho hợp lý nhé chỉ cần thay email và password của bạn là được. Chú ý ở đây với email và password mình bỏ env() đi. Why ? tại bởi vì nếu bạn có file .env rồi nó sẽ lấy ở trong env ra. Thực sự cũng không ảnh ưởng lắm nhưng nếu không bỏ env() thì có thể bị lỗi authen. Mình bị mà không sao biết được nguyên nhân T.T . Cách sửa là tạm thời bỏ env() đi.
Vậy là xong bước config
Bước 2: Hiển thị trên view
Thực sự thì cũng không phải làm gì nhưng nếu bạn đang học và chưa có sẵn màn hình nào thì có thể dùng code của mình copy paste and run Nếu có màn hình đó rồi bạn có thể bỏ qua bước này form.blade.php
{!! Form::open(array('route' => 'front.fb', 'class' => '')) !!}
    <div>
        <label  class="email">Your name</label>
            {!! Form::text('name', null, ['class' => 'input-text', 'placeholder'=>"Your name"]) !!}
    </div><div>
        <label  class="email">Your email</label>
            {!! Form::text('email', null, ['class' => 'input-text', 'placeholder'=>"Your email"]) !!}
    </div><div>
        <label class="email">Comments</label>
            {!! Form::textarea('comment', null, ['class' => 'tarea', 'rows'=>"5"]) !!}
    </div><div class="send">
        {!! Form::submit('Send', ['class' => 'button']) !!}
    </div>
    {!! Form::close() !!}
Bạn tiến hành thêm route để có thể xem được form này nhé app\Http\routes
Route::get('/', function () {
    return view('form');
});
Rồi giờ bạn vào trang chính của project bạn sẽ nhìn thấy form hiện lên đơn giản với 3 trường name, email, comment. Hơi xấu phải không vì mình lười quá chả buồn thêm css nữa mà thực sự thêm css vào mất thời gian cho đẹp thôi chứ cũng không quan trọng vì bài này chỉ hướng dẫn đơn giản nhất sao cho bạn có thể gửi mail với laravel thoy. Thông cảm mình nhé (nguong). Done .Giờ ta tiến sang bước 3
Bước 3 Xử lý
Bạn để ý bước 2 nhé. route của mình để là frontfb nên mình sẽ thêm route cho form khi post để điều hướng xử lý. thêm vào file route
Route::post('/message/send', ['uses' => 'FrontController@addFeedback', 'as' => 'front.fb']);
Giờ bạn vào app/Http/Controller và tạo FrontController.php Trong file bạn viết như sau
<?php

namespace App\Http\Controllers;
use Illuminate\Support\Facades\Session;
use Illuminate\Http\Request;
use Mail;
class FrontController extends Controller
{
    public function addFeedback(Request $request)
    {
        $input = $request->all();
        Mail::send('mailfb', array('name'=>$input["name"],'email'=>$input["email"], 'content'=>$input['comment']), function($message){
	        $message->to('[email protected]', 'Visitor')->subject('Visitor Feedback!');
	    });
        Session::flash('flash_message', 'Send message successfully!');

        return view('form');
    }
}
nhìn vào đống code có 1 số cái chú í sau: use Illuminate\Http\Request; Cái này mình để lấy ra các giá trị của form khi post lên server. use Mail; Quá rõ ràng rồi gửi mail Giờ mình sẽ chỉ giải thích cho Mail thôi nhé. Mail::send('tên template mail sẽ gửi đi'), array(các biến truyền với với key và value), function($message){ $message->to('địa chỉ mail được gửi đến', tên hiển thị)->subject(chủ đề gửi); Đó done Giờ ta sẽ vào thêm template mail gửi đi Tạo file mailfb.blade.php ở trong folder /app/resource/view/ rồi thêm nội dung sau
{{$name}}
{{$email}}
{{$content}}
Done. Giờ có khi là gửi mail được rồi đấy. Bạn test thử xem.
Giờ quay lại mình hướng dẫn tạo mật khẩu ứng dụng cho gmail nhé
bước 1 : vào link myaccount.google.com

Chọn đăng nhập vào Google. Trong cái cột đầu tiên
Chọn mật khẩu ứng dụng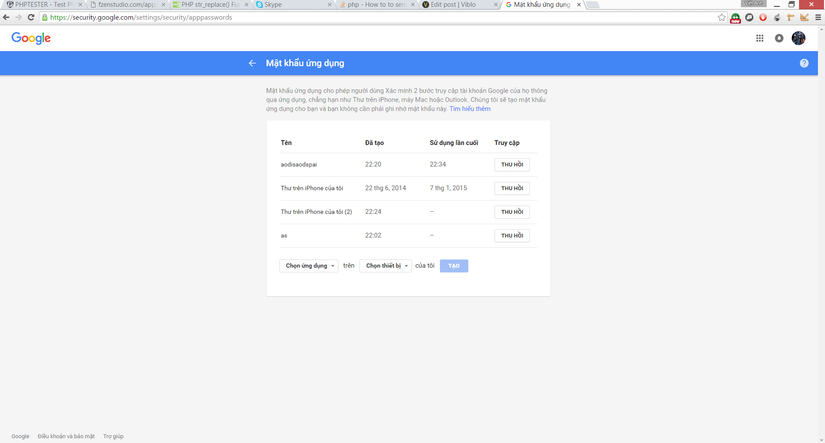
Sau đó chọn tạo nhập tên cho mật khẩu google sẽ cho bạn 1 mật khẩu app gồm 16 kí tự bạn copy rồi paste vào config là xong. Done . Hết tút . Xin chào và hẹn gặp lại bạn trong chương trình lần sau