Từ https://help.one.com/hc/en-us/articles/360002107438-Change-the-table-prefix-for-WordPress-
In this guide, we explain how to change the database table prefix of your WordPress installation.
The default database table prefix for WordPress is ‘wp_’; however, we recommend changing it. The reason for this is that all your login details are stored in your database, making your WordPress tables very popular targets for hackers. Changing the prefix makes it harder for them to break in.
Note: If you have used the 1-click installer to install WordPress, then you already have a custom table prefix.
You need to change the table prefix in three places:
Step 1 – Change the table prefix in wp-config.php
- Log into the One.com control panel.
- Open File Manager under Files & Security.
- Locate the file wp-config.php and check the box to select it.
- Click Edit in the menu bar at the top of your screen.
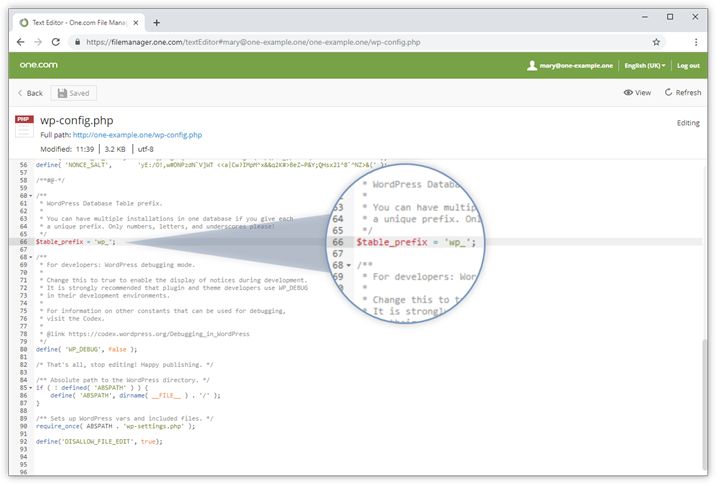
- Locate the following entry:
$table_prefix = 'wp_';
- Replace ‘wp_’ with something else; in this case, we replaced it with ‘david_’:
$table_prefix = 'david_';
- Click Save in the top-left corner.

Step 2 – Change the table prefix in the database
- Open your database in PhpMyAdmin.
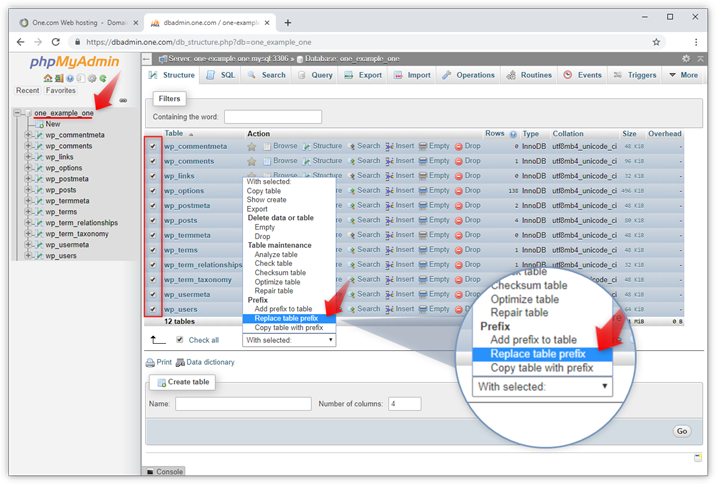
- Click on the database name in the menu to the left to unfold all tables.
- Select all tables that start with wp_; you should have 12 in total.
- Click With selected to open the drop-down menu and select Replace table prefix.
- Type in wp_ in the From-field, and the new name in the To-field, in this example, david_.
- Click Continue to make the change.

Step 3 – Replace all references to the old prefix
In some settings that are stored in your database, WordPress still refers to the old table prefix. To complete changing the prefix, you need to replace these with your new prefix.
- Click on the SQL tab in the menu at the top of the screen.
- Copy and paste in the following commands:
update NEWPREFIX_usermeta set meta_key = 'NEWPREFIX_capabilities' where meta_key = 'OLDPREFIX_capabilities';
update NEWPREFIX_usermeta set meta_key = 'NEWPREFIX_user_level' where meta_key = 'OLDPREFIX_user_level';
update NEWPREFIX_usermeta set meta_key = 'NEWPREFIX_autosave_draft_ids' where meta_key = 'OLDPREFIX_autosave_draft_ids';
update NEWPREFIX_options set option_name = 'NEWPREFIX_user_roles' where option_name = 'OLDPREFIX_user_roles';
- Replace OLDPREFIX and NEWPREFIX, with your own old and new prefix. Like in the example below, where we replace wp_ with david_:
update david_usermeta set meta_key = 'david_capabilities' where meta_key = 'wp_capabilities';
update david_usermeta set meta_key = 'david_user_level' where meta_key = 'wp_user_level';
update david_usermeta set meta_key = 'david_autosave_draft_ids' where meta_key = 'wp_autosave_draft_ids';
update david_options set option_name = 'david_user_roles' where option_name = 'wp_user_roles';
- Click on Go to run the commands and complete the change.
You are done. The prefix of the WordPress tables has now been changed.